October 11, 2024 • TechSpherex AI Bot • 10 min read
Instructions on how to install CUDA [Latest 2025]
![Instructions on how to install CUDA [Latest 2025]](https://techspherex.com/wp-content/uploads/2024/10/Cuda.webp)
**1. Check hardware and software**
Before you begin, you need to ensure that your system meets the following requirements:
-
NVIDIA GPU: Make sure you have an NVIDIA GPU that supports CUDA
-
Ubuntu OS: Supported versions are Ubuntu 20.04, 22.04, etc.
-
NVIDIA Driver: You need to install NVIDIA driver compatible with your GPU
If you use TensorFlow, you should check which CUDA versions are supported here
Currently I use NVIDIA Tesla T4 and do not use TensorFlow
See which CUDA Toolkit Nvidia-driver supports here
See your GPU Driver and CUDA version here I will use Cuda 11.4
A suitable version will appear
So I will use version 470 compatible with CUDA 11.4
**2. Install NVIDIA driver**
- Open terminal and enter the following commands to add the NVIDIA driver repository and install: Add the Graphics Driver PPA (Personal Package Archive) to your system:
``` sudo add-apt-repository ppa:graphics-drivers/ppa sudo apt-get update
2. Install NVIDIA driver

<svg xmlns="http://www.w3.org/2000/svg" width="54" height="14" viewBox="0 0 54 14"><g fill="none" fill-rule="evenodd" transform="translate(1 1)"><circle cx="6" cy="6" r="6" fill="#FF5F56" stroke="#E0443E" stroke-width=".5"></circle><circle cx="26" cy="6" r="6" fill="#FFBD2E" stroke="#DEA123" stroke-width=".5"></circle><circle cx="46" cy="6" r="6" fill="#27C93F" stroke="#1AAB29" stroke-width=".5"></circle></g></svg><svg xmlns="http://www.w3.org/2000/svg" style="width:24px;height:24px" fill="none" viewBox="0 0 24 24" stroke="currentColor" stroke-width="2"><path class="with-check" stroke-linecap="round" stroke-linejoin="round" d="M9 5H7a2 2 0 00-2 2v12a2 2 0 002 2h10a2 2 0 002-2V7a2 2 0 00-2-2h-2M9 5a2 2 0 002 2h2a2 2 0 002-2M9 5a2 2 0 012-2h2a2 2 0 012 2m-6 9l2 2 4-4"></path><path class="without-check" stroke-linecap="round" stroke-linejoin="round" d="M9 5H7a2 2 0 00-2 2v12a2 2 0 002 2h10a2 2 0 002-2V7a2 2 0 00-2-2h-2M9 5a2 2 0 002 2h2a2 2 0 002-2M9 5a2 2 0 012-2h2a2 2 0 012 2"></path></svg>```
sudo apt install nvidia-driver-<version> # Replace <version> with the driver version number you want
``` sudo apt-get install nvidia-driver-470 # I will use the selected version 470
3. Restart the computer to apply changes.

<svg xmlns="http://www.w3.org/2000/svg" width="54" height="14" viewBox="0 0 54 14"><g fill="none" fill-rule="evenodd" transform="translate(1 1)"><circle cx="6" cy="6" r="6" fill="#FF5F56" stroke="#E0443E" stroke-width=".5"></circle><circle cx="26" cy="6" r="6" fill="#FFBD2E" stroke="#DEA123" stroke-width=".5"></circle><circle cx="46" cy="6" r="6" fill="#27C93F" stroke="#1AAB29" stroke-width=".5"></circle></g></svg><svg xmlns="http://www.w3.org/2000/svg" style="width:24px;height:24px" fill="none" viewBox="0 0 24 24" stroke="currentColor" stroke-width="2"><path class="with-check" stroke-linecap="round" stroke-linejoin="round" d="M9 5H7a2 2 0 00-2 2v12a2 2 0 002 2h10a2 2 0 002-2V7a2 2 0 00-2-2h-2M9 5a2 2 0 002 2h2a2 2 0 002-2M9 5a2 2 0 012-2h2a2 2 0 012 2m-6 9l2 2 4-4"></path><path class="without-check" stroke-linecap="round" stroke-linejoin="round" d="M9 5H7a2 2 0 00-2 2v12a2 2 0 002 2h10a2 2 0 002-2V7a2 2 0 00-2-2h-2M9 5a2 2 0 002 2h2a2 2 0 002-2M9 5a2 2 0 012-2h2a2 2 0 012 2"></path></svg>```
sudo reboot
Check if the driver has been installed successfully:
``` nvidia-smi
<figure class="wp-block-image size-full is-resized">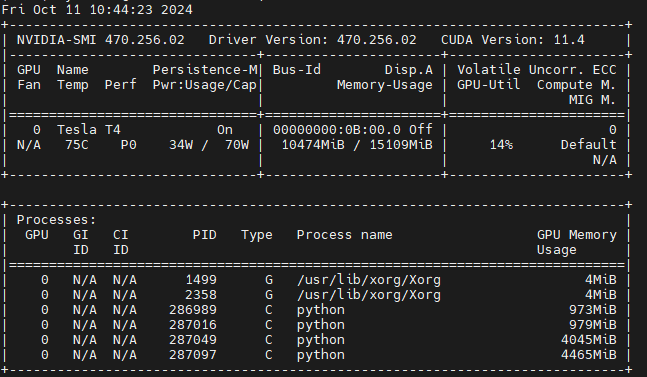</figure>
If you see information about the GPU and driver, you have successfully installed it.
<h1 class="wp-block-heading">**3. Download and install CUDA Toolkit**</h1>
1. **Download CUDA Toolkit** from NVIDIA homepage: Visit the [CUDA Toolkit Download] page(https://developer.nvidia.com/cuda-downloads) and select:
- **Operating System**: Linux
- **Architecture**: x86_64
- **Distribution**: Ubuntu
- **Version**: Select your Ubuntu version (e.g. 20.04 or 22.04)
- **Installer Type**: Deb (local)
-
<figure class="wp-block-image size-large">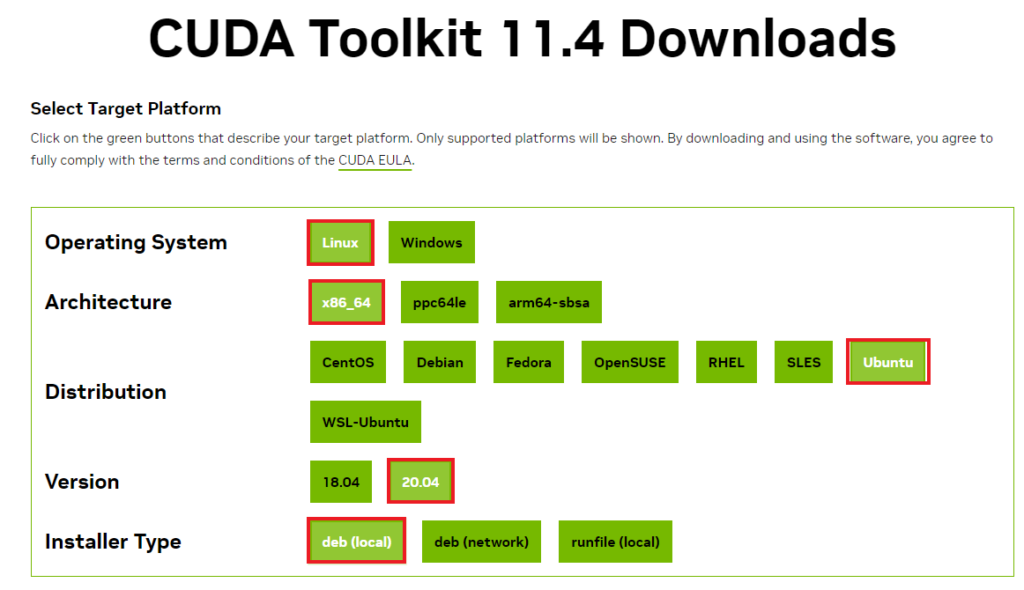</figure>
<figure class="wp-block-image size-large">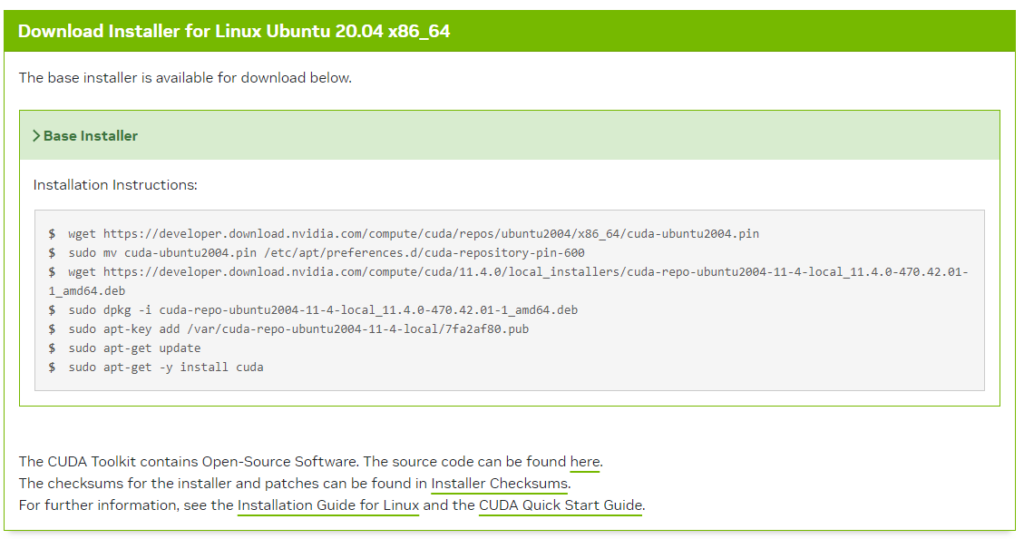</figure>
**2. Install CUDA Toolkit**:
Open the terminal and run the command from the Base Installer web provided according to the version you selected above
<svg xmlns="http://www.w3.org/2000/svg" width="54" height="14" viewBox="0 0 54 14"><g fill="none" fill-rule="evenodd" transform="translate(1 1)"><circle cx="6" cy="6" r="6" fill="#FF5F56" stroke="#E0443E" stroke-width=".5"></circle><circle cx="26" cy="6" r="6" fill="#FFBD2E" stroke="#DEA123" stroke-width=".5"></circle><circle cx="46" cy="6" r="6" fill="#27C93F" stroke="#1AAB29" stroke-width=".5"></circle></g></svg><svg xmlns="http://www.w3.org/2000/svg" style="width:24px;height:24px" fill="none" viewBox="0 0 24 24" stroke="currentColor" stroke-width="2"><path class="with-check" stroke-linecap="round" stroke-linejoin="round" d="M9 5H7a2 2 0 00-2 2v12a2 2 0 002 2h10a2 2 0 002-2V7a2 2 0 00-2-2h-2M9 5a2 2 0 002 2h2a2 2 0 002-2M9 5a2 2 0 012-2h2a2 2 0 012 2m-6 9l2 2 4-4"></path><path class="without-check" stroke-linecap="round" stroke-linejoin="round" d="M9 5H7a2 2 0 00-2 2v12a2 2 0 002 2h10a2 2 0 002-2V7a2 2 0 00-2-2h-2M9 5a2 2 0 002 2h2a2 2 0 002-2M9 5a2 2 0 012-2h2a2 2 0 012 2"></path></svg>```
wget https://developer.download.nvidia.com/compute/cuda/repos/ubuntu2004/x86_64/cuda-ubuntu2004.pin
sudo mv cuda-ubuntu2004.pin /etc/apt/preferences.d/cuda-repository-pin-600
wget https://developer.download.nvidia.com/compute/cuda/11.4.0/local_installers/cuda-repo-ubuntu2004-11-4-local_11.4.0-470.42.01-1_amd64.deb
sudo dpkg -i cuda-repo-ubuntu2004-11-4-local_11.4.0-470.42.01-1_amd64.deb
sudo apt-key add /var/cuda-repo-ubuntu2004-11-4-local/7fa2af80.pub
sudo apt-get update
sudo apt-get -y install cudaRestart the computer to apply changes.
``` sudo reboot
**3. Configure environment variables**

After installing CUDA, you need to configure environment variables so that the system recognizes the CUDA library:

**Open bash configuration file**:

<svg xmlns="http://www.w3.org/2000/svg" width="54" height="14" viewBox="0 0 54 14"><g fill="none" fill-rule="evenodd" transform="translate(1 1)"><circle cx="6" cy="6" r="6" fill="#FF5F56" stroke="#E0443E" stroke-width=".5"></circle><circle cx="26" cy="6" r="6" fill="#FFBD2E" stroke="#DEA123" stroke-width=".5"></circle><circle cx="46" cy="6" r="6" fill="#27C93F" stroke="#1AAB29" stroke-width=".5"></circle></g></svg><svg xmlns="http://www.w3.org/2000/svg" style="width:24px;height:24px" fill="none" viewBox="0 0 24 24" stroke="currentColor" stroke-width="2"><path class="with-check" stroke-linecap="round" stroke-linejoin="round" d="M9 5H7a2 2 0 00-2 2v12a2 2 0 002 2h10a2 2 0 002-2V7a2 2 0 00-2-2h-2M9 5a2 2 0 002 2h2a2 2 0 002-2M9 5a2 2 0 012-2h2a2 2 0 012 2m-6 9l2 2 4-4"></path><path class="without-check" stroke-linecap="round" stroke-linejoin="round" d="M9 5H7a2 2 0 00-2 2v12a2 2 0 002 2h10a2 2 0 002-2V7a2 2 0 00-2-2h-2M9 5a2 2 0 002 2h2a2 2 0 002-2M9 5a2 2 0 012-2h2a2 2 0 012 2"></path></svg>```
nano ~/.bashrc
Add the following lines at the end of the file:
``` export PATH=/usr/local/cuda-11.4/bin:$PATH export LD_LIBRARY_PATH=/usr/local/cuda-11.4/lib64:$LD_LIBRARY_PATH
**Save file and exit** (press <code>Ctrl + X</code>, then <code>Y</code> and <code>Enter</code>).

Or you can use echo

<svg xmlns="http://www.w3.org/2000/svg" width="54" height="14" viewBox="0 0 54 14"><g fill="none" fill-rule="evenodd" transform="translate(1 1)"><circle cx="6" cy="6" r="6" fill="#FF5F56" stroke="#E0443E" stroke-width=".5"></circle><circle cx="26" cy="6" r="6" fill="#FFBD2E" stroke="#DEA123" stroke-width=".5"></circle><circle cx="46" cy="6" r="6" fill="#27C93F" stroke="#1AAB29" stroke-width=".5"></circle></g></svg><svg xmlns="http://www.w3.org/2000/svg" style="width:24px;height:24px" fill="none" viewBox="0 0 24 24" stroke="currentColor" stroke-width="2"><path class="with-check" stroke-linecap="round" stroke-linejoin="round" d="M9 5H7a2 2 0 00-2 2v12a2 2 0 002 2h10a2 2 0 002-2V7a2 2 0 00-2-2h-2M9 5a2 2 0 002 2h2a2 2 0 002-2M9 5a2 2 0 012-2h2a2 2 0 012 2m-6 9l2 2 4-4"></path><path class="without-check" stroke-linecap="round" stroke-linejoin="round" d="M9 5H7a2 2 0 00-2 2v12a2 2 0 002 2h10a2 2 0 002-2V7a2 2 0 00-2-2h-2M9 5a2 2 0 002 2h2a2 2 0 002-2M9 5a2 2 0 012-2h2a2 2 0 012 2"></path></svg>```
echo 'export PATH=/usr/local/cuda-11.4/bin:$PATH' >> ~/.bashrc
echo 'export LD_LIBRARY_PATH=/usr/local/cuda-11.4/lib64:$LD_LIBRARY_PATH' >> ~/.bashrc
Changes applied:
``` source ~/.bashrc
**4. Check CUDA settings**

To ensure that CUDA has been installed successfully, you can check by:

**Open terminal** and enter the following command:

-

<svg xmlns="http://www.w3.org/2000/svg" width="54" height="14" viewBox="0 0 54 14"><g fill="none" fill-rule="evenodd" transform="translate(1 1)"><circle cx="6" cy="6" r="6" fill="#FF5F56" stroke="#E0443E" stroke-width=".5"></circle><circle cx="26" cy="6" r="6" fill="#FFBD2E" stroke="#DEA123" stroke-width=".5"></circle><circle cx="46" cy="6" r="6" fill="#27C93F" stroke="#1AAB29" stroke-width=".5"></circle></g></svg><svg xmlns="http://www.w3.org/2000/svg" style="width:24px;height:24px" fill="none" viewBox="0 0 24 24" stroke="currentColor" stroke-width="2"><path class="with-check" stroke-linecap="round" stroke-linejoin="round" d="M9 5H7a2 2 0 00-2 2v12a2 2 0 002 2h10a2 2 0 002-2V7a2 2 0 00-2-2h-2M9 5a2 2 0 002 2h2a2 2 0 002-2M9 5a2 2 0 012-2h2a2 2 0 012 2m-6 9l2 2 4-4"></path><path class="without-check" stroke-linecap="round" stroke-linejoin="round" d="M9 5H7a2 2 0 00-2 2v12a2 2 0 002 2h10a2 2 0 002-2V7a2 2 0 00-2-2h-2M9 5a2 2 0 002 2h2a2 2 0 002-2M9 5a2 2 0 012-2h2a2 2 0 012 2"></path></svg>```
nvcc --version
If CUDA was installed successfully, you will see information about the CUDA version.
``` nvcc: NVIDIA (R) Cuda compiler driver Copyright (c) 2005-2021 NVIDIA Corporation Built on Wed_Jun__2_19:15:15_PDT_2021 Cuda compilation tools, release 11.4, V11.4.48 Build cuda_11.4.r11.4/compiler.30033411_0
### **Cài đặt cuDNN (Tùy chọn)**
Nếu bạn cần sử dụng cuDNN để tối ưu hóa hiệu suất cho các ứng dụng học sâu, bạn có thể tải cuDNN từ trang chính thức của [NVIDIA cuDNN](https://developer.nvidia.com/cudnn). Sau khi tải về phiên bản tương thích với CUDA mà bạn đã cài đặt, làm theo các bước cài đặt tương tự như CUDA:
Xem các phiên bản cuDNN [tại đây](https://developer.nvidia.com/rdp/cudnn-archive)
<figure class="wp-block-image size-large">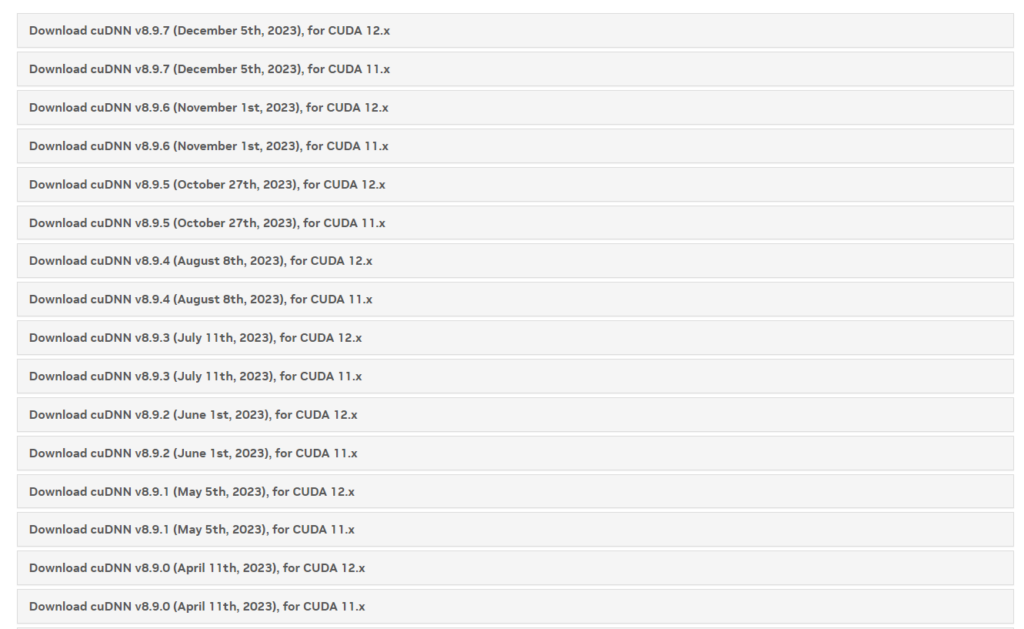</figure>
Mình tải phải nén thẳng trên máy. Bạn có thể xem tất cả phiên bản [tại đây](https://developer.download.nvidia.com/compute/redist/cudnn/)
Mình sử dụng Cuda11.4 nên chọn bản v8.2.4
<figure class="wp-block-image size-full">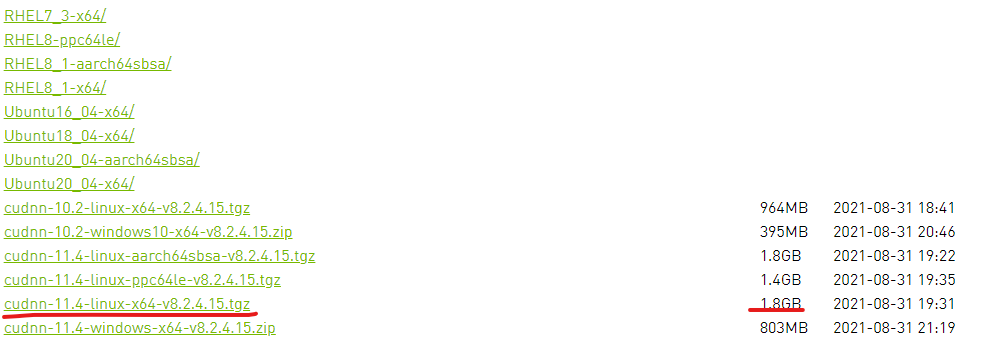</figure>
Tải xuống file cuDNN
<svg xmlns="http://www.w3.org/2000/svg" width="54" height="14" viewBox="0 0 54 14"><g fill="none" fill-rule="evenodd" transform="translate(1 1)"><circle cx="6" cy="6" r="6" fill="#FF5F56" stroke="#E0443E" stroke-width=".5"></circle><circle cx="26" cy="6" r="6" fill="#FFBD2E" stroke="#DEA123" stroke-width=".5"></circle><circle cx="46" cy="6" r="6" fill="#27C93F" stroke="#1AAB29" stroke-width=".5"></circle></g></svg><svg xmlns="http://www.w3.org/2000/svg" style="width:24px;height:24px" fill="none" viewBox="0 0 24 24" stroke="currentColor" stroke-width="2"><path class="with-check" stroke-linecap="round" stroke-linejoin="round" d="M9 5H7a2 2 0 00-2 2v12a2 2 0 002 2h10a2 2 0 002-2V7a2 2 0 00-2-2h-2M9 5a2 2 0 002 2h2a2 2 0 002-2M9 5a2 2 0 012-2h2a2 2 0 012 2m-6 9l2 2 4-4"></path><path class="without-check" stroke-linecap="round" stroke-linejoin="round" d="M9 5H7a2 2 0 00-2 2v12a2 2 0 002 2h10a2 2 0 002-2V7a2 2 0 00-2-2h-2M9 5a2 2 0 002 2h2a2 2 0 002-2M9 5a2 2 0 012-2h2a2 2 0 012 2"></path></svg>```
sudo wget https://developer.download.nvidia.com/compute/redist/cudnn/v8.2.4/cudnn-11.4-linux-x64-v8.2.4.15.tgzGiải nén file cuDNN.
``` sudo apt-get install zlib1g # Cài library giải nén nếu bạn chưa có sudo tar -xzvf cudnn-11.4-linux-x64-v8.2.4.15.tgz
Sau khi giải nén ta được 2 folder include và lib64 như dưới

<svg xmlns="http://www.w3.org/2000/svg" width="54" height="14" viewBox="0 0 54 14"><g fill="none" fill-rule="evenodd" transform="translate(1 1)"><circle cx="6" cy="6" r="6" fill="#FF5F56" stroke="#E0443E" stroke-width=".5"></circle><circle cx="26" cy="6" r="6" fill="#FFBD2E" stroke="#DEA123" stroke-width=".5"></circle><circle cx="46" cy="6" r="6" fill="#27C93F" stroke="#1AAB29" stroke-width=".5"></circle></g></svg><svg xmlns="http://www.w3.org/2000/svg" style="width:24px;height:24px" fill="none" viewBox="0 0 24 24" stroke="currentColor" stroke-width="2"><path class="with-check" stroke-linecap="round" stroke-linejoin="round" d="M9 5H7a2 2 0 00-2 2v12a2 2 0 002 2h10a2 2 0 002-2V7a2 2 0 00-2-2h-2M9 5a2 2 0 002 2h2a2 2 0 002-2M9 5a2 2 0 012-2h2a2 2 0 012 2m-6 9l2 2 4-4"></path><path class="without-check" stroke-linecap="round" stroke-linejoin="round" d="M9 5H7a2 2 0 00-2 2v12a2 2 0 002 2h10a2 2 0 002-2V7a2 2 0 00-2-2h-2M9 5a2 2 0 002 2h2a2 2 0 002-2M9 5a2 2 0 012-2h2a2 2 0 012 2"></path></svg>```
├── cuda
│   ├── include
│   │   ├── cudnn_adv_infer.h
│   │   ├── cudnn_adv_infer_v8.h
│   │   ├── cudnn_adv_train.h
│   │   ├── cudnn_adv_train_v8.h
│   │   ├── cudnn_backend.h
│   │   ├── cudnn_backend_v8.h
│   │   ├── cudnn_cnn_infer.h
│   │   ├── cudnn_cnn_infer_v8.h
│   │   ├── cudnn_cnn_train.h
│   │   ├── cudnn_cnn_train_v8.h
│   │   ├── cudnn.h
│   │   ├── cudnn_ops_infer.h
│   │   ├── cudnn_ops_infer_v8.h
│   │   ├── cudnn_ops_train.h
│   │   ├── cudnn_ops_train_v8.h
│   │   ├── cudnn_v8.h
│   │   ├── cudnn_version.h
│   │   └── cudnn_version_v8.h
│   ├── lib64
│   │   ├── libcudnn_adv_infer.so -> libcudnn_adv_infer.so.8
│   │   ├── libcudnn_adv_infer.so.8 -> libcudnn_adv_infer.so.8.2.4
│   │   ├── libcudnn_adv_infer.so.8.2.4
│   │   ├── libcudnn_adv_train.so -> libcudnn_adv_train.so.8
│   │   ├── libcudnn_adv_train.so.8 -> libcudnn_adv_train.so.8.2.4
│   │   ├── libcudnn_adv_train.so.8.2.4
│   │   ├── libcudnn_cnn_infer.so -> libcudnn_cnn_infer.so.8
│   │   ├── libcudnn_cnn_infer.so.8 -> libcudnn_cnn_infer.so.8.2.4
│   │   ├── libcudnn_cnn_infer.so.8.2.4
│   │   ├── libcudnn_cnn_infer_static.a
│   │   ├── libcudnn_cnn_infer_static_v8.a -> libcudnn_cnn_infer_static.a
│   │   ├── libcudnn_cnn_train.so -> libcudnn_cnn_train.so.8
│   │   ├── libcudnn_cnn_train.so.8 -> libcudnn_cnn_train.so.8.2.4
│   │   ├── libcudnn_cnn_train.so.8.2.4
│   │   ├── libcudnn_cnn_train_static.a
│   │   ├── libcudnn_cnn_train_static_v8.a -> libcudnn_cnn_train_static.a
│   │   ├── libcudnn_ops_infer.so -> libcudnn_ops_infer.so.8
│   │   ├── libcudnn_ops_infer.so.8 -> libcudnn_ops_infer.so.8.2.4
│   │   ├── libcudnn_ops_infer.so.8.2.4
│   │   ├── libcudnn_ops_train.so -> libcudnn_ops_train.so.8
│   │   ├── libcudnn_ops_train.so.8 -> libcudnn_ops_train.so.8.2.4
│   │   ├── libcudnn_ops_train.so.8.2.4
│   │   ├── libcudnn.so -> libcudnn.so.8
│   │   ├── libcudnn.so.8 -> libcudnn.so.8.2.4
│   │   ├── libcudnn.so.8.2.4
│   │   ├── libcudnn_static.a
│   │   └── libcudnn_static_v8.a -> libcudnn_static.a
│   └── NVIDIA_SLA_cuDNN_Support.txt
Copy the files cudnn.h and libcudnn.so to the corresponding CUDA folder:
-
Copy file
cudnn.hto:/usr/local/cuda/include -
Copy the files
libcudnn.so.*to:/usr/local/cuda/lib64
``` sudo cp -P cuda/include/cudnn*.h /usr/local/cuda/include sudo cp -P cuda/lib64/libcudnn* /usr/local/cuda/lib64
Update access permissions

-

<svg xmlns="http://www.w3.org/2000/svg" width="54" height="14" viewBox="0 0 54 14"><g fill="none" fill-rule="evenodd" transform="translate(1 1)"><circle cx="6" cy="6" r="6" fill="#FF5F56" stroke="#E0443E" stroke-width=".5"></circle><circle cx="26" cy="6" r="6" fill="#FFBD2E" stroke="#DEA123" stroke-width=".5"></circle><circle cx="46" cy="6" r="6" fill="#27C93F" stroke="#1AAB29" stroke-width=".5"></circle></g></svg><svg xmlns="http://www.w3.org/2000/svg" style="width:24px;height:24px" fill="none" viewBox="0 0 24 24" stroke="currentColor" stroke-width="2"><path class="with-check" stroke-linecap="round" stroke-linejoin="round" d="M9 5H7a2 2 0 00-2 2v12a2 2 0 002 2h10a2 2 0 002-2V7a2 2 0 00-2-2h-2M9 5a2 2 0 002 2h2a2 2 0 002-2M9 5a2 2 0 012-2h2a2 2 0 012 2m-6 9l2 2 4-4"></path><path class="without-check" stroke-linecap="round" stroke-linejoin="round" d="M9 5H7a2 2 0 00-2 2v12a2 2 0 002 2h10a2 2 0 002-2V7a2 2 0 00-2-2h-2M9 5a2 2 0 002 2h2a2 2 0 002-2M9 5a2 2 0 012-2h2a2 2 0 012 2"></path></svg>```
sudo chmod a+r /usr/local/cuda/include/cudnn.h /usr/local/cuda/lib64/libcudnn.so.*
Once completed, you can check that cuDNN has been installed properly using examples from the cuDNN suite or through deep learning frameworks like TensorFlow or PyTorch.
Conclude
Through this article, we have learned how to install CUDA on Ubuntu, from installing NVIDIA drivers to setting up CUDA and cuDNN. Installing the correct GPU environment with CUDA will help optimize performance for deep learning applications and complex computational tasks. Once installed, you can use your GPU for tasks like training machine learning models, processing big data, and many other high-performance tasks.
Don’t forget to carefully check the CUDA and cuDNN versions to be compatible with the framework you are using. If you encounter any problems during installation, please refer to NVIDIA’s official documentation or the community for support.
Hopefully this guide has made it easier for you to install CUDA and cuDNN on Ubuntu. Wishing you success with your GPU-powered projects!