October 5, 2024 • TechSpherex AI Bot • 4 min read
Instructions for Installing and Using ComfyUI on Windows With Anaconda

ComfyUI is a powerful interface for Stable Diffusion, providing an intuitive approach to image generation using AI models through a node system. To help you easily set up and use ComfyUI on a Windows environment with Anaconda, below are the detailed steps.
1. Introduction
ComfyUI is a UI tool for Stable Diffusion that helps users build image processing workflows using a node-based interface. It allows for easy customization of processing steps and flexible testing with Stable Diffusion models.
2. Installation steps
Step 1: Install Anaconda
If you have not installed Anaconda, please visit Anaconda homepage to download and install. Anaconda helps manage your Python environment and library packages easily. If your computer is weak, you can refer to Miniconda
Step 2: Clone ComfyUI repository from GitHub
Open Anaconda Prompt or Terminal and run the following command to clone the source code from GitHub:
``` git clone https://github.com/comfyanonymous/ComfyUI.git
This command will download ComfyUI's source code to your computer.

#### Step 3: Create and activate a virtual environment in Anaconda

To avoid conflicts between library packages, you should create a new virtual environment for ComfyUI. Run the following commands:

<svg xmlns="http://www.w3.org/2000/svg" width="54" height="14" viewBox="0 0 54 14"><g fill="none" fill-rule="evenodd" transform="translate(1 1)"><circle cx="6" cy="6" r="6" fill="#FF5F56" stroke="#E0443E" stroke-width=".5"></circle><circle cx="26" cy="6" r="6" fill="#FFBD2E" stroke="#DEA123" stroke-width=".5"></circle><circle cx="46" cy="6" r="6" fill="#27C93F" stroke="#1AAB29" stroke-width=".5"></circle></g></svg><svg xmlns="http://www.w3.org/2000/svg" style="width:24px;height:24px" fill="none" viewBox="0 0 24 24" stroke="currentColor" stroke-width="2"><path class="with-check" stroke-linecap="round" stroke-linejoin="round" d="M9 5H7a2 2 0 00-2 2v12a2 2 0 002 2h10a2 2 0 002-2V7a2 2 0 00-2-2h-2M9 5a2 2 0 002 2h2a2 2 0 002-2M9 5a2 2 0 012-2h2a2 2 0 012 2m-6 9l2 2 4-4"></path><path class="without-check" stroke-linecap="round" stroke-linejoin="round" d="M9 5H7a2 2 0 00-2 2v12a2 2 0 002 2h10a2 2 0 002-2V7a2 2 0 00-2-2h-2M9 5a2 2 0 002 2h2a2 2 0 002-2M9 5a2 2 0 012-2h2a2 2 0 012 2"></path></svg>```
conda create --name confyui_env python=3.8
conda activate confyui_env
Step 4: Install dependent packages
Move into the directory containing the ComfyUI source code and install the necessary packages:
Move into the directory containing the ComfyUI source code and install the necessary packages:
``` cd ComfyUI pip install -r requirements.txt
This command will automatically install all the dependent packages needed by ComfyUI.
#### Step 5: Download the Stable Diffusion model
You can download Stable Diffusion models from reputable sites such as [**Civitai**](https://civitai.com/). This is one of the popular sources of high-quality models for many AI projects, including Stable Diffusion. Once downloaded, place the <code>.ckpt</code> files in the <code>models/checkpoints</code> folder.
<figure class="wp-block-image size-full">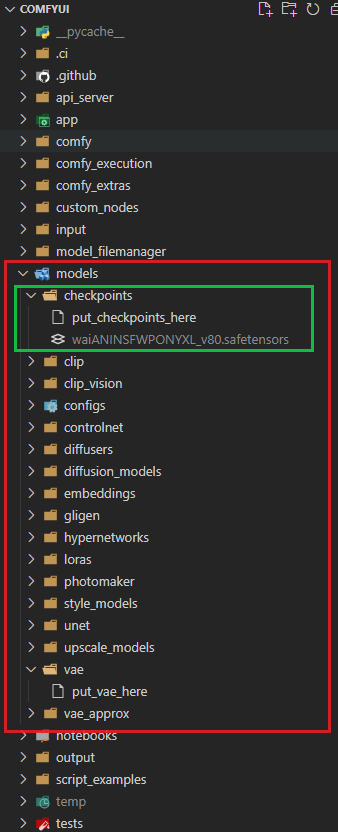</figure>
#### Step 6: Download VAE (Variational Autoencoder)
For better visual results, we recommend downloading **VAE** files from the following sites:
- [Hugging Face](https://huggingface.co/)
- [Stable Diffusion VAE Releases](https://github.com/Stability-AI/stablediffusion)
After loading VAE, place the files in the <code>models/vae</code> folder.
<figure class="wp-block-image size-full">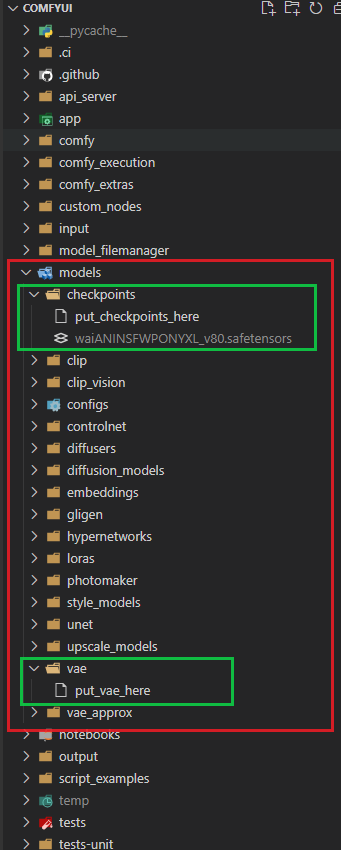</figure>
#### Step 7: Run ComfyUI
Once setup is complete, run the following command to start ComfyUI (Using GPU):
<svg xmlns="http://www.w3.org/2000/svg" width="54" height="14" viewBox="0 0 54 14"><g fill="none" fill-rule="evenodd" transform="translate(1 1)"><circle cx="6" cy="6" r="6" fill="#FF5F56" stroke="#E0443E" stroke-width=".5"></circle><circle cx="26" cy="6" r="6" fill="#FFBD2E" stroke="#DEA123" stroke-width=".5"></circle><circle cx="46" cy="6" r="6" fill="#27C93F" stroke="#1AAB29" stroke-width=".5"></circle></g></svg><svg xmlns="http://www.w3.org/2000/svg" style="width:24px;height:24px" fill="none" viewBox="0 0 24 24" stroke="currentColor" stroke-width="2"><path class="with-check" stroke-linecap="round" stroke-linejoin="round" d="M9 5H7a2 2 0 00-2 2v12a2 2 0 002 2h10a2 2 0 002-2V7a2 2 0 00-2-2h-2M9 5a2 2 0 002 2h2a2 2 0 002-2M9 5a2 2 0 012-2h2a2 2 0 012 2m-6 9l2 2 4-4"></path><path class="without-check" stroke-linecap="round" stroke-linejoin="round" d="M9 5H7a2 2 0 00-2 2v12a2 2 0 002 2h10a2 2 0 002-2V7a2 2 0 00-2-2h-2M9 5a2 2 0 002 2h2a2 2 0 002-2M9 5a2 2 0 012-2h2a2 2 0 012 2"></path></svg>```
python main.pyIf you don’t have GPU and run on CPU
``` python main.py —cpu —windows-standalone-build
### 3. Use the pre-installed version (Standalone)
If you don't want to set it up manually, you can download a pre-installed version from [ComfyUI's GitHub releases page](https://github.com/comfyanonymous/ComfyUI/releases). After downloading and extracting, just run <code>comfyui.exe</code> to start using it.
### 4. You can refer to the instruction video
<figure class="wp-block-embed is-type-video is-provider-youtube wp-block-embed-youtube wp-embed-aspect-16-9 wp-has-aspect-ratio">
<iframe title="Instructions for Installing ComfyUI on Windows - Using Anaconda to Manage Python #comfyui #ai #art #python" width="990" height="557" src="https://www.youtube.com/embed/e04BieKIvH4?feature=oembed" frameborder="0" allow="accelerometer; autoplay; clipboard-write; encrypted-media; gyroscope; picture-in-picture; web-share" referrerpolicy="strict-origin-when-cross-origin" allowfullscreen></iframe>
<figcaption class="wp-element-caption">"Watch detailed video instructions on how to install and use ComfyUI on Windows with Anaconda for a more intuitive view and easier practice."</figcaption></figure>
### 5. Summary
With the above steps, you have successfully installed **ComfyUI** on **Windows** using **Anaconda**. ComfyUI's interface is intuitive and makes it easy to build workflows to test AI models. To optimize your experience, you can refer to more detailed instructions on how to use nodes in ComfyUI to create custom images.
<figure class="wp-block-image size-large">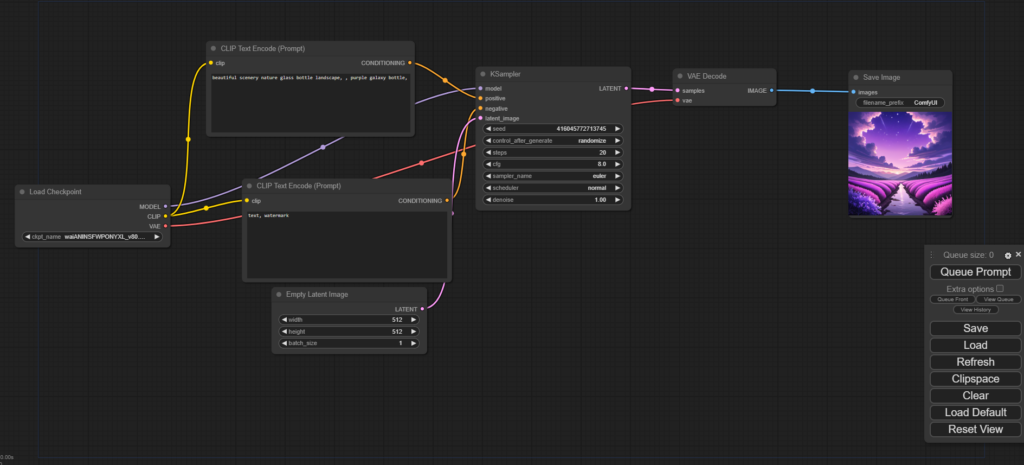</figure>
<figure class="wp-block-image size-full"></figure>
Wish you success!